Sunday, March 31, 2013

DIY: Patchwork-layered Wallpocket

I started making fabric wall-pockets for the wall next to my bed, because I needed somewhere to put my book before dozing off. It ended up being the perfect solution to our nightstand-lacking problem, so I made another one to hold our glasses, too. The first ones I made were kind of plain, and not so sturdy, so I decided to make something a little cuter and more durable. Here's a little DIY tutorial if you want to make one for yourself...

PATCHWORK-LAYERED WALLPOCKET DIY:

WHAT YOU NEED:
-scissors
-iron
-sewing machine
-fabric (I used light grey linen for the pocket, dark grey for the back, and pretty fabric scraps for the patches)
-2 metal thumb tacks


I made this little collage of fabric as a sort of guide, so I can just refer to different swatches of fabric by their number. I don't know if that will make this tutorial seem more simple, or more complicated, but let's try it anyway. I used a heavier linen for fabrics 1 & 2. These will compose the main body of your wall pocket (1 is the large back-piece, and 2 is the small front piece). Fabrics 3-5 are just whatever pretty scraps you have laying around that look good together.


STEP ONE: cut your fabric!
Fabric 1: cut 2 pieces @ 6.5" x 9.5" and 1 piece @ 1.5" x 6.5" (this will be used as a patch!)
Fabric 2: cut 1 piece @ 5" x 6.5"
Fabrics 3-5: cut out patches in whatever size you want! :)


STEP TWO: sew them patches on!
This is the most fun part - you pick the size, placement & overlap, so play with it until it looks good to you. I like to fold back the edges and iron them, so the patches look all clean and straight, but I left some edges raw, 'cause I like the varying texture. I added some lace onto mine, 'cause it felt like it was missing something. I sewed a patch onto the large back piece of the pocket, to peek out from inside the pocket when it's all finished. Also - that long skinny piece you cut from fabric 1, is going to be sewed along the bottom edge of the front pocket piece, to sort of pull it all together by repeating that back color, and also reinforce that bottom edge.

STEP THREE: sew it all together! 
I don't have pictures for this, because it was the most frustrating step for me! Let me explain instead. First, you'll wanna get everything ready by folding & ironing and pinning (yawn!). Fold and iron the edges back 1/4th of an inch all around, and then place the big pieces back to back (so the folded edges are hiding) and throw that dolled-up front pocket-piece in front (tucking the folded, ironed edges between the two back pieces) and pin it so everything looks all neat and stuff. Then, slowly, carefully sew around that outer edge. I sewed as close to the edge as I could get, so those folded edges would stay put. Good luck! I almost lost my cool on this step.

STEP FOUR: tack it up on the wall and put it to use:

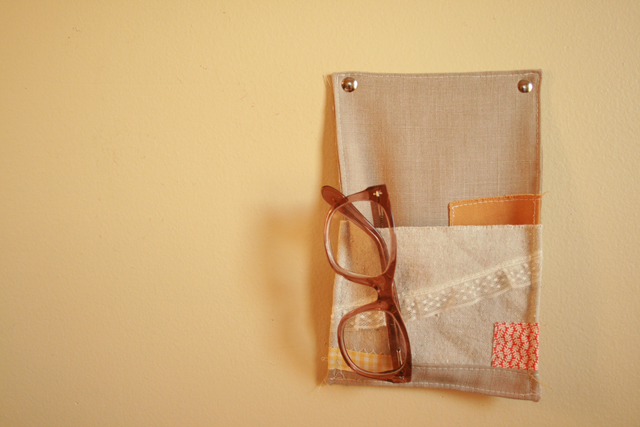
Hope you guys like the tutorial. I definitely wanna see what you come up with, if you decide to give it a go. They're surprisingly convenient little things. I wanna make one to put next to the front door, for my car keys - I always throw my keys on the floor, and I can never find them!

-Elizabeth


Sunday, March 24, 2013

Shop Update!

I finally finally got the etsy shop updated!
CLICK HERE TO CHECK IT OUT, YA'LL

New brooches, new pictures, and a new banner, huzzah! I think it's all the sunshine we've had. Ahh, I love spring. I feel so much more productive and positive. Here's a few brooches from this batch:
Here's a coupon code for all you lovely readers: HAPPYSPRING
That will give you 20% off anything in the shop until the end of April, yay! I've lowered the price of a few things, and organized things a bit. I hope you like it! and, let me know if anybody wants a custom badge of honor brooch, too! I'm excited to make some more :)

-Elizabeth

Saturday, March 23, 2013

Nifty Thrifty Finds

We went to the Goodwill outlet today. Oh my goodness. Have you ever been to their outlet stores? They have huge amounts of various thrift store matter, thrown into huge plastic bins that customers dig through like squealing pigs at a freshly-filled trough. It's a madhouse. Franklin sticks to the electronics and I stick to the book bins, because the other bins are filled with questionable things, and it begins to feel like I'm digging through a dumpster. I always find sweet old books though, and they only charge like 29 cents a pound, I love it.

Here's what I found in the book bin today:


1. Some amazing full-sheet bar-graphs depicting the nutritional value of various school lunch items, hahaha. They were printed in 1980, and I'm seriously in love with them.
2. A beautiful assortment of old graph paper, ahhh.
3. This REALLY incredible mid-century DIY furniture book, and a science book about light & vision that I look forward to reading...WITH MY EYES!

Here's a little peek at the details:


Anyway. I was just so excited, I had to share my findings, haha.

In other news, Franklin has started circuit bending! He buys old keyboards, opens them up, and makes some crazy sounds using wires, a soldering iron and switches and things. He's probably gonna make a post about it soon (finally! when does he ever update this thing anyway?!) and I'm finally going to start jewelry-making again. The spring time makes me all excited for new projects, I love it.

What I'm listening to: Caribou - The Pixies

-Elizabeth

Sunday, March 17, 2013

I got nothin' on electro

Franklin & I drunkenly covered a Wolfie song the other night. They're a band from the mid-90s that isn't all that well known, and we couldn't find the lyrics anywhere, so we had to make like a couple of middle-schoolers without internet access and figure out the lyrics ourselves - gasp! It was like trying to decipher some sort of ancient code, it felt like. It was fun, though. It took us longer to figure out the lyrics than it did to figure out how to play the song, haha.

Here is the video footage of our sloppy drunken cover:

SONG: "You're gonna fall back into it, but I'll always love you" by Wolfie

Please excuse that weird part at the end.
We're both a little strange, and it sometimes shows.

In other news: we bought a fancy little tablet the other day, so now I'm officially on instagram now! finally. there's a little widget on the side there, if you wanna follow. the name's discolizzy. I haven't really got that much on there right now, 'cause we just got it, but, yeah. I have the STRONGEST urge to spend the rest of my day at the public library, so, I better go before they close. happy st. patrick's day!

-Elizabeth

Sunday, March 10, 2013

Sunny Days and Beehives

OUTFIT DETAILS:
Pink dress: TJ Maxx (the brand is three ena)
Mustard cardigan: J. Crew
Shoes: Minnetonka
Hair bow: Anykind
Tote: Chronicle Books tote illustrated by Mike Perry

Sunny days were made for big, lopsided beehives, I think. I don't know about you, but big hair seems to make everything feel more fun, somehow. I just got this dress - isn't it lovely? I rarely buy clothes that aren't from a thrift store, haha, but I decided to pop into TJ Maxx out of curiousity, and found this beauty. It was the last one in my size, and it was only 20 bucks. super score! It's comfy and dainty at the same time, and the scalloped edges around the buttons are so cute!

Also, while I was in my backyard with Franklin, taking pictures in the sun, I found this rubber bouncy ball that I lost a few months ago. Here's a picture of me triumphantly catching it after bouncing it super high!:

I will never get too old to enjoy bouncy balls. or bubbles. I effing LOVE blowing bubbles. My favorite part of doing the dishes, is cleaning the spatula, 'cause the grates are perfect for blowing gigantic bubbles, ha! Nothing is quite as satisfying as blowing a bubble that's larger than your head, haha. I meant to be more productive this weekend, and post some pictures of different projects, but I ended up getting sick again so I was pretty lazy this weekend. Lots and lots of napping. Working at a preschool = being sick ALL THE TIME. This is the main reason I don't update as often as I'd like, but hopefully my immune system will be pretty bad-ass after a while? I hope so.

What I'm listening to: Bewitched - Beat Happening

-Elizabeth


Sunday, March 3, 2013

Melon-flavored everything


I grew up on a US Navy base in Japan, so I had access to all sorts of crazy delicious food there, and one thing I miss, is that you could find nearly anything in MELON FLAVOR. It's harder to find anything over here, but thank the universe for Asian grocery stores. We kinda live out in the country, so we have to travel an hour to Seattle to acquire all of our tasty Japanese snacks, but it's better than nothing, I guess! Did you know that they have all sorts of different flavored Kit-Kat in Japan? Melon, matcha, blueberry cheesecake, creme brulee, strawberry, pineapple, even wasabi!! Like, why not here in the states? haha. Why?! They're still super hard to find, even if you make the trek to a Japanese grocery store. Sometimes I'm tempted to buy a small box of them on amazon, haha, but they're like 25 bucks, and I can't really justify that.

Do you guys have a crazy sweet-tooth like me, or food that you just can't live without? I kind of wish I never made that little collage of sweets up above, because now I'm super hungry for Japanese junk food, haha. sigh.

My melon-inspired outfit:
OUTFIT DETAILS:
striped sweater: vintage
dress underneath: handmade (reconstructed from a top, my deerhoof shirt, and a slip!)
knee highs: I wish I could remember.
shoes: thrifted
brooch: handmade (lefty high five brooch)

-Elizabeth
Related Posts Plugin for WordPress, Blogger...